Western Australian Renewable Fuels Association
Western Australian Renewable Fuels Association |
| Projects | Contacts | Meetings | Links | Oilseeds |
Upflow settling system for WVO
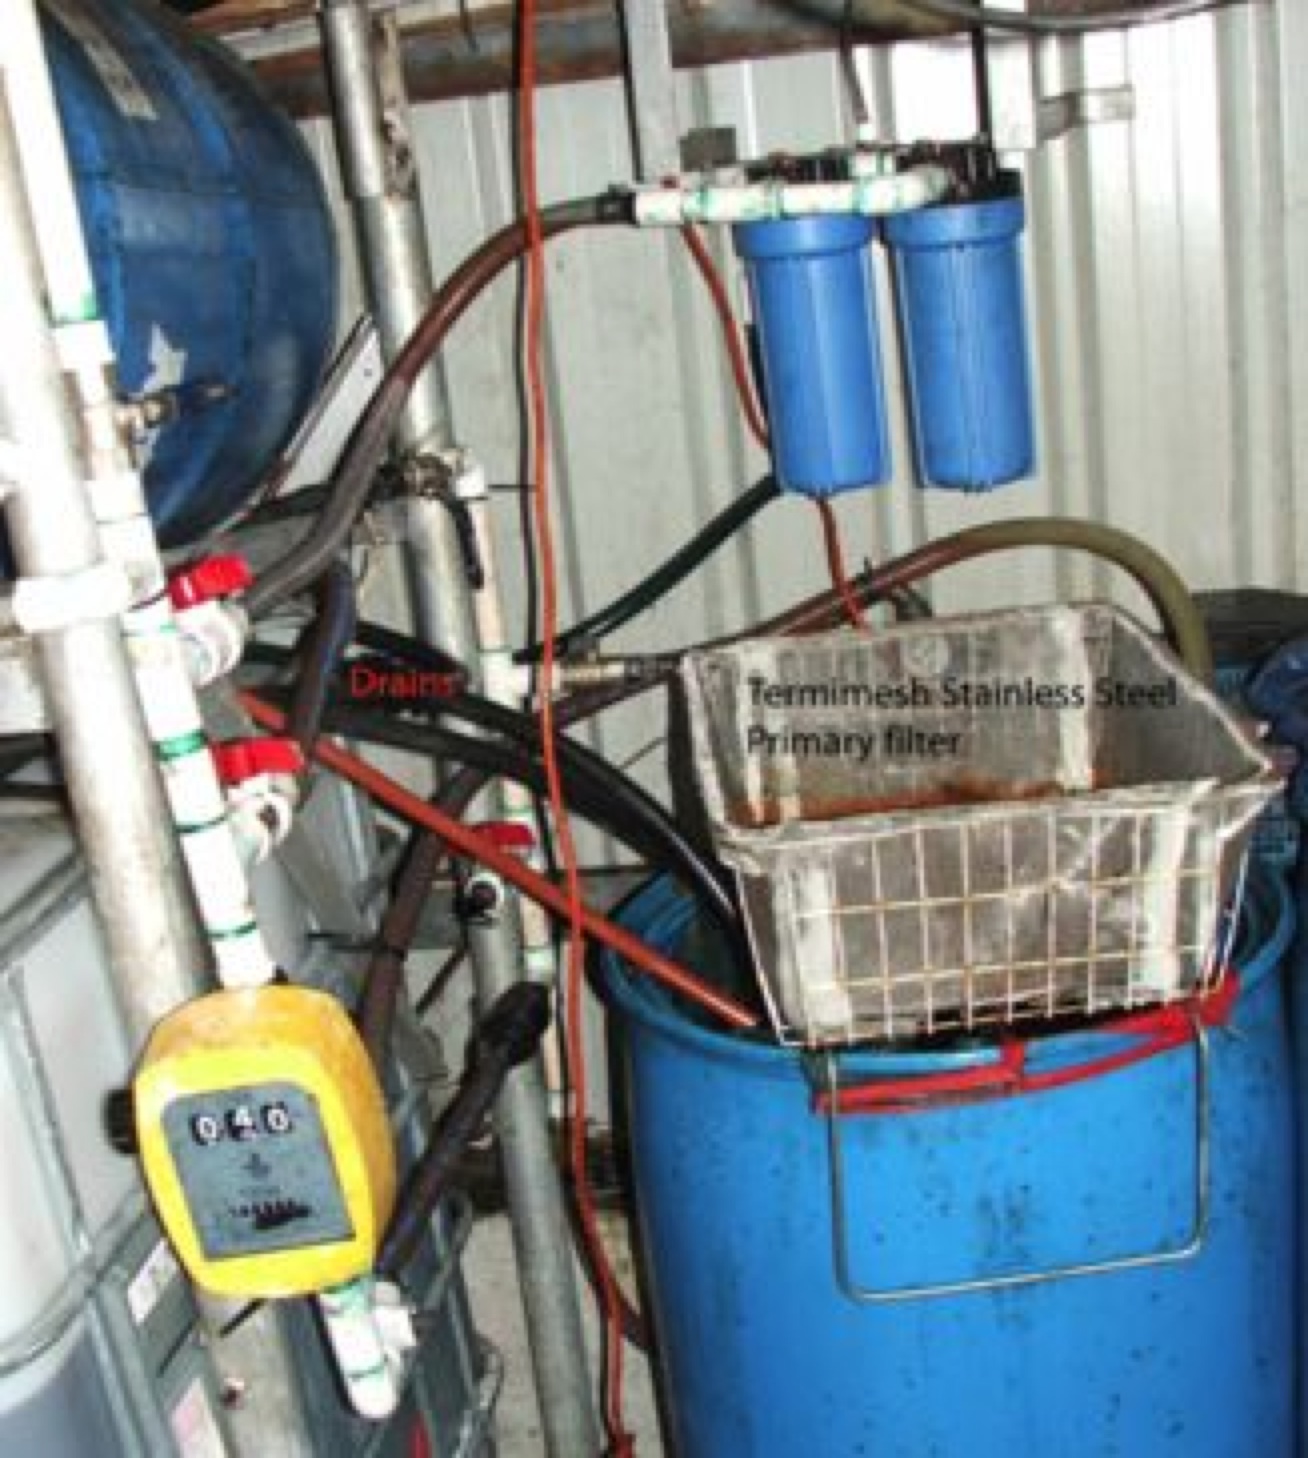
This system was displayed to members in the Shed Day in November 2009. There is a thread in the BioFuels Forum about Upflow Settling systems My system is primarily only a settling system, relying on the age old principals of time and gravity - basically heavy stuff settles. At each stage of the process, clean oil at the top is displaced by 'dirty' oil pumped in the bottom. Read on to see how it works. I pick up oil from the fish and chip shop in open topped 20 litre drums. They are sealed in the shop. I do pick up a lot of their waste lumpy bits which doesn't impress me but I don't see the point in complaining more than pointing out that I much prefer it when they use their filter pump to fill my drums as it leaves the chips and sardine remnants in their waste, not for me to pay for! The Chippy Matriach is not someone to mess with!! First I pour the oil through a course strainer made out of Termimesh, which is stainless steel mesh designed to keep termites out of houses. It is formed into a frame of an old wire basket and works very effectively. Several layers of flywire would have a similar effectiveness. This wire basket sits over the top of a 200 litre open topped blue
plastic barrel. The wire basket is held up by a small frame that stops
it falling
into the barrel. What is a Bunnings Bag?
Click on image for High Resolution version When fat builds up in these bags, it is scraped off with a kitchen scoop and disposed of into a hole in the garden for the worms to eat over time. Each month or so the Bunnings bags are removed and cleaned in glycerol and reused. Sometimes they sneak into the family washing machine for a 50°C wash. Given they cost $1 I'm not sure of the carbon footprint and economic analysis of this practice :-) They don't last forever and deteriorate over time, so you'll need to budget for buying a few bags a year. Another disposal idea for the fats and sludges is to mix the sludge with sawdust or fine woodchips and compress it into small blocks inside a 1 litre waxed milk carton, then burn it in an open fire for winter home heating. These are excellent fireblocks. They need to be added to a burning fire, and don't put more than two onto a fire at one time - the heat will be much more intense than you expect! The suction pickup of the pump is set about 200mm from the base of the Blue Drum and has a non return valve on the end of it. If necessary, I can clean out this Blue drum using a hand turned drum pump that sucks up most things and allows reprocessing of any collected large bits and fats that have slipped past the Bunnings bags.
The settling process consists of two 200 litre steel drums laid over on their side. The oil is pumped into the bottom of Drum 1 and as the drum fills, it comes out the large top hole and through a length of thin wall black poly into the bottom bung of Drum 2. Only the cleanest oil comes out the top as the heavier gunk has settled. This gunk can be removed via a bung I have welded into the side (now it is tipped over it has become the base) of the steel drums. This drains back into the Bunnings bags for reprocessing. The drums are cantered back a little so the bung is at the lowest point. You do not have to weld a bung onto the drum if you are worried about explosions, or not so confident with brazing. Bunnings and other hardware suppliers stock a flange fitting that is designed to be inserted from the inside of the drum. It has a gasket material, improved with a coating of Sikaflex, shaped like a mushroom, and a threaded pipe that fits neatly through a hole that you drill into the side of the drum. Okay, so how do you get the flange fitting inside the drum and through the hole? Easy. Run a piece of fencing wire, or similar material, from the hole in the drum to the larger opening at the top of the drum. Once the wire is sticking out at both ends, coat the flange gasket with Sikaflex sealant, and slide it down the wire - make sure you send it down the right way around!!. The flange slides easily down the wire and with a wiggle or two, you can fish it out through the hole you have created at the bottom of the drum. Then you screw the locknut on from the outside and the jobs done. Let the Sikaflex set and you have an excellent drain hole with no welding required.
Click on image for High Resolution version
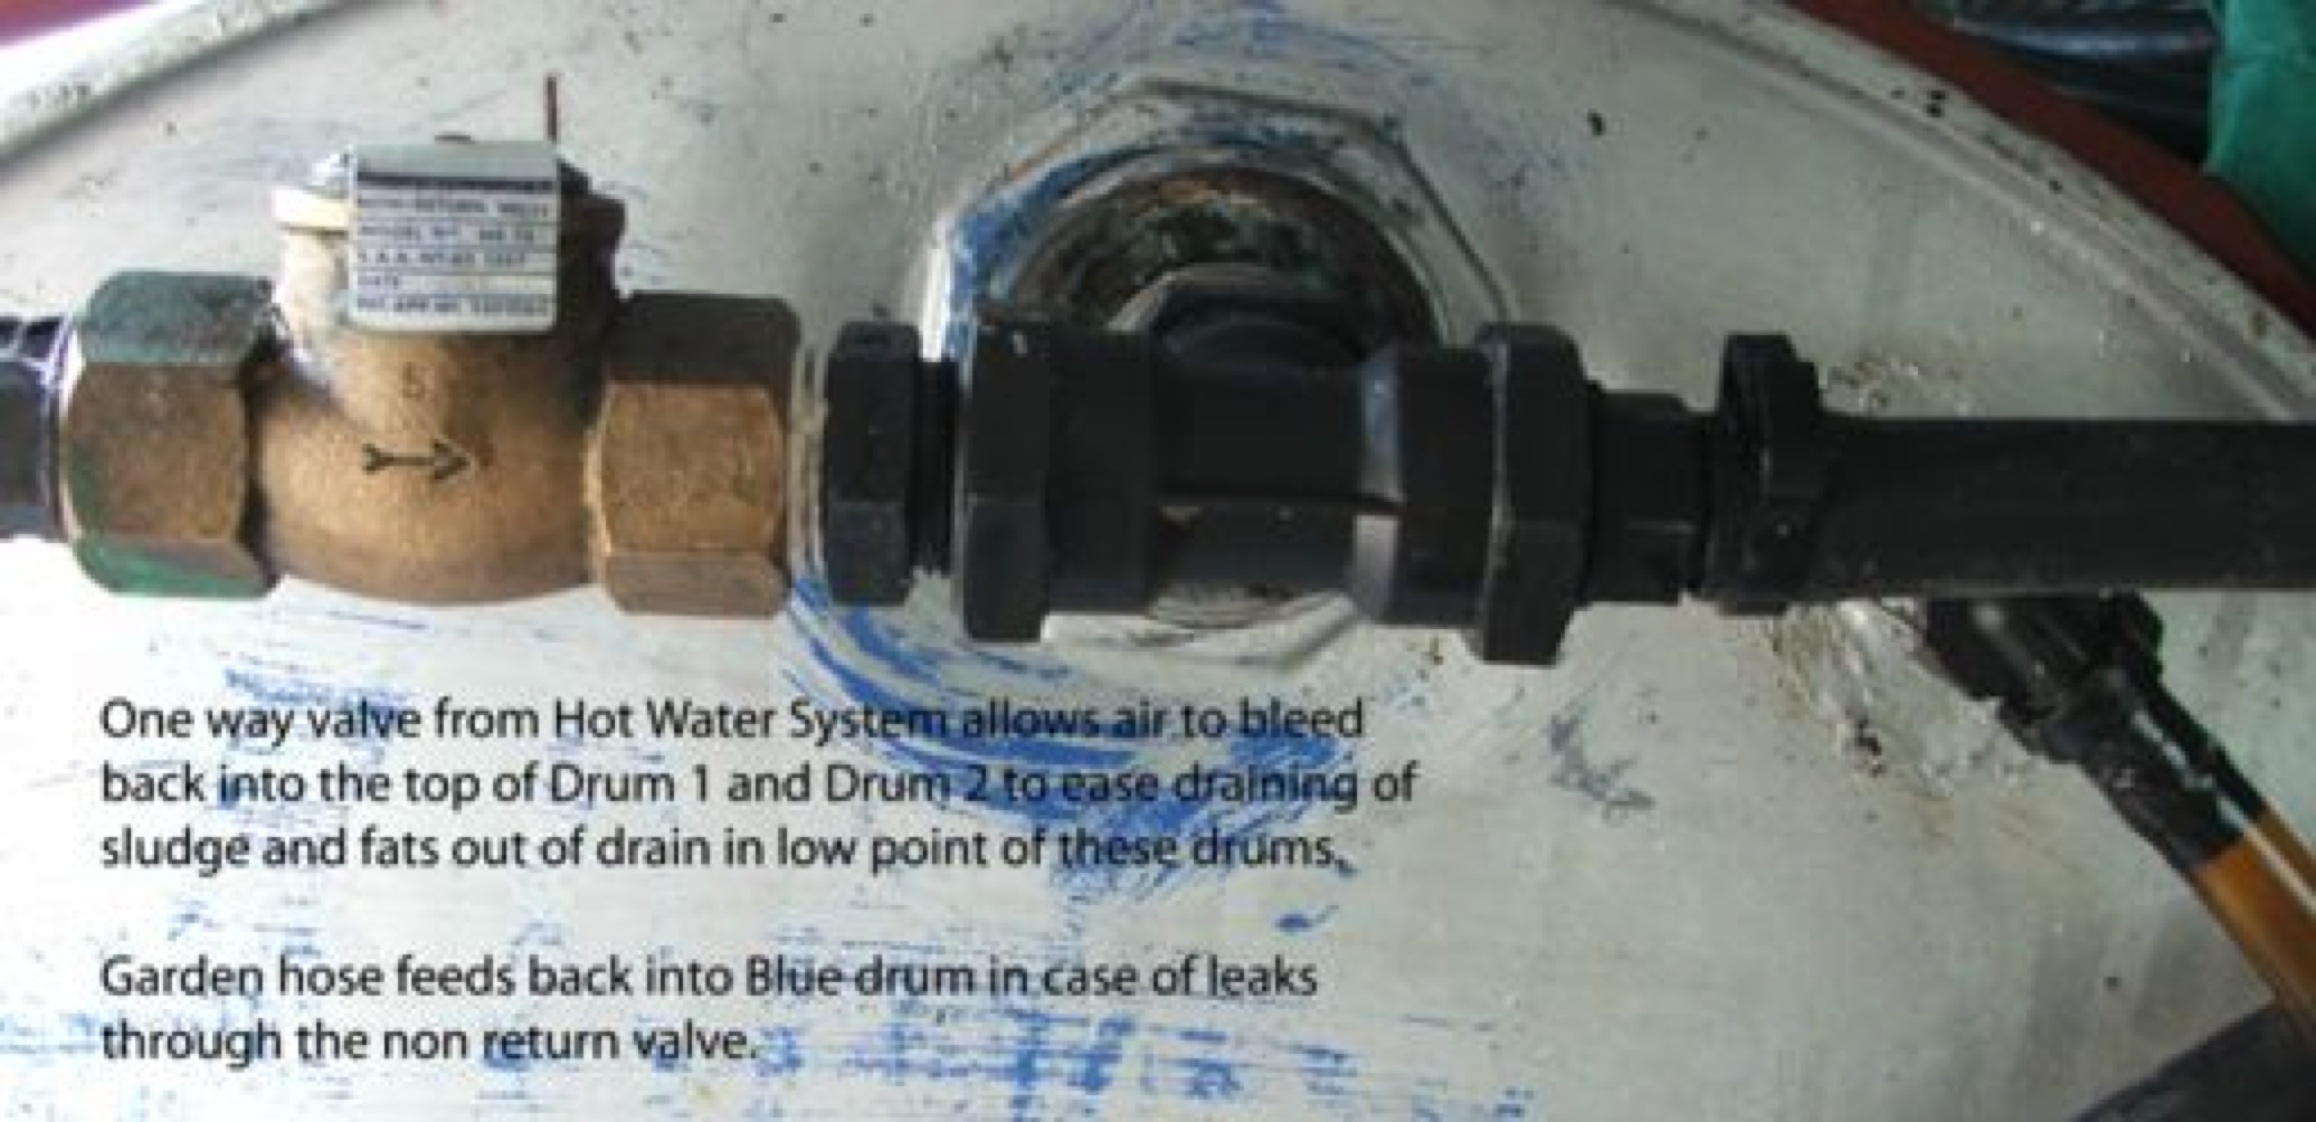
Draining crud is made easier by allowing air back into the tops of the drums via a non return valve on each drum. In case these non return valves leak under pump pressure, they are connected to a hose that feeds back into the Bunnings bags. Allowing the air to get back into the drums really speeds up the drain flow. I will often drain 10 litres of oil out of drum 1 and 5 out of drum 2 to ensure dirty oil is not mixed into the well settled oil when the pump is turned on.
Click on image for High Resolution version
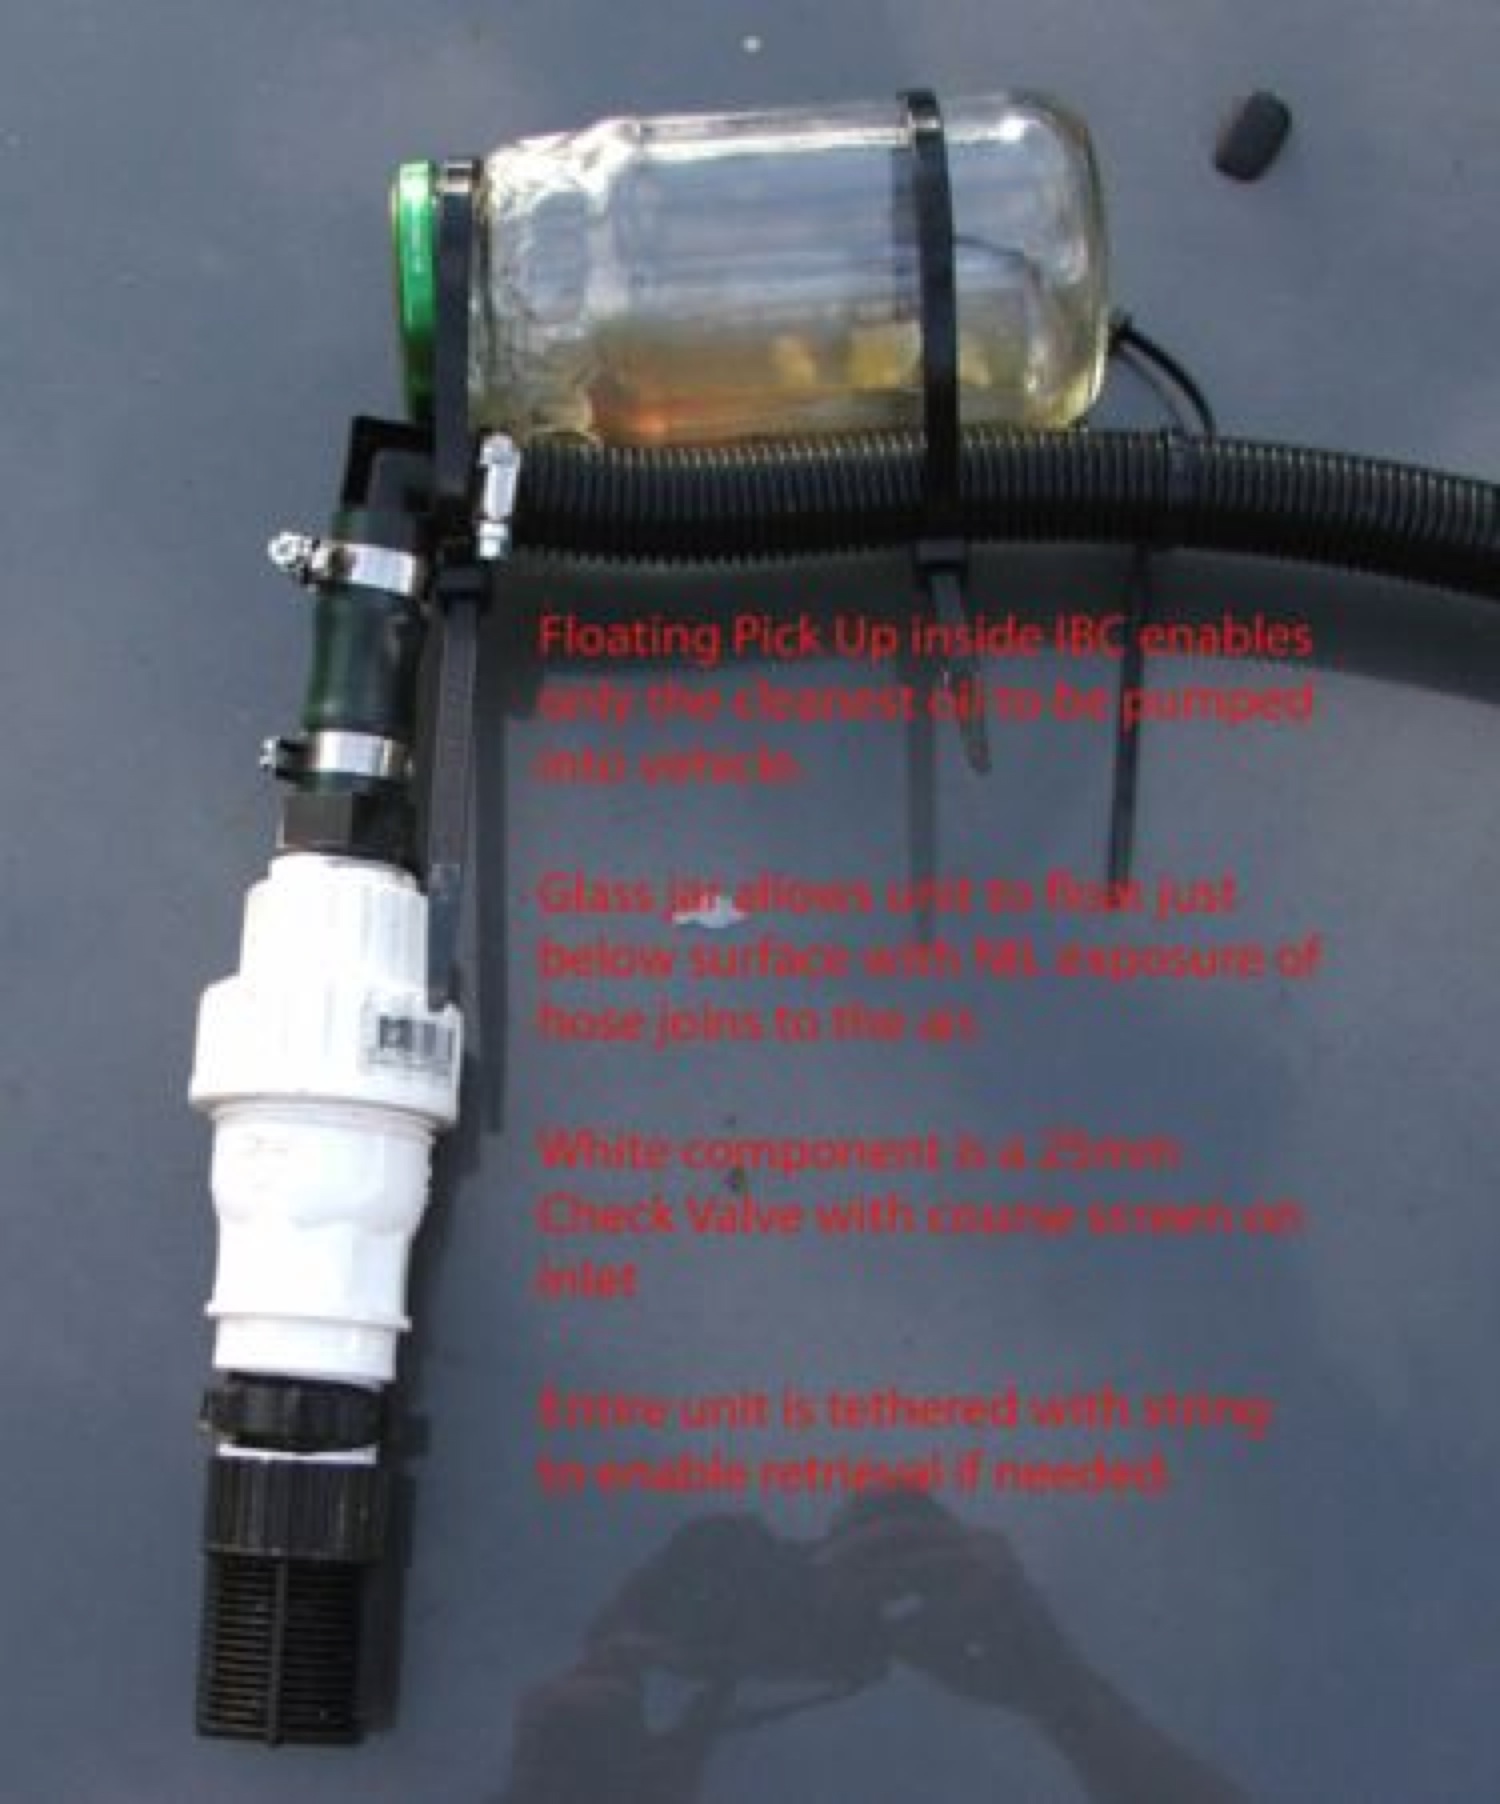
Back to the oil flow. Oil is pumped IN the bottom of drum 1. That is always full. The oil then flows from the top (cleanest) of Drum 1 and into the bottom (Dirty) of Drum 2. Once Drum 2 is full, the very clean oil is displaced out of the top bung hole and into the 1000 litre IBC that sits underneath the two 200 litre steel drums. The white PVC spear goes right to the bottom of the IBC to minimise the stirring of the oil. Any air that has been drawn into the steel drums is expelled via a small hole drilled in the PVC pipe just inside the top of the IBC and above the general oil level. This has dramatically reduced the bubbles coming out the bottom of this PVC pipe which tended to stir up the oil in the IBC. Thanks to Tony of West Oz for this suggestion. It should be noted this is a settling process. It relies on gravity and time to work effectively, and minimal disturbance of the oil in the settling drums. I leave as much oil as I can in the first Blue tank - about 150 litres, before pumping into the start of the settling tanks, to extend the time period the oil is sitting and clearing without disturbance. To fuel my Landcruiser, I wanted to draw only from the top of the oil in the IBC to obtain the cleanest Golden Fuel. I have achieved this by building a floating pickup made of a non return valve cable tied to a glass jar. There is 2 metres of lightweight black poly hose in the IBC that is connected to a PVC spear that goes to the bottom of the IBC. This way all the connections inside the IBC are under oil, reducing the chance of sucking air into the suction line. The glass jar is around 400mls in capacity and holds the pipe and pickup just nicely. This device has a length of string attached so I can fish it out of the small hole in the top of the IBC if necessary.
Click on image for High Resolution version
The pumping system. I have one manifold for supply to the gear pump and one manifold on discharge. Manifolds are made of 20mm PVC reticulation pipe. Several supply and discharge options are available. I can suck from the Blue open top drum, or the clean oil from the IBC by changing valves around. I can pump out to the steel drums, to the filters or to two options for filling vehicles. One of these options has a bowser outlet that fits into the vehicle filler neck, and it has been plumbed with PVC pipe to the rear of the garage some 10 metres from the storage tanks so I can fill my car with ease and no unravelling of hoses. I simply lift the bowser handset and put it into the filler neck, then go turn on the pump and gaze with pride how easy it all is - now! Getting to this point has taken four years of development and refinement. I have incorporated a modified black poly non return valve
and it is now a pressure release valve. I unscrewed the valve
and
replaced the
light weight spring with a heavier one cut to the right size.
This opens at about 40 psi which means I can let the bowser
handset go
and calmly
move to switch off the pump when the tank is full. The excess
oil
bleeds through the pressure relief valve and back into the
suction of the
pump. Cross fingers no more overfills or burst hoses. Other points:
What would I change? I'd like to add a 80 psi electric pressure switch so I could turn off the mechanical pressure relief valve with it's valve in order to push higher pressure through the filters if necessary. It'd be handy to know that whatever happened, the electric motor would cut out if the pressures got too high. (See update comment below. These extra filters are redundant) Does it work? Hope this is useful folks.
Update - August 2010 I'm finding the Blue 'under sink water filters' in this system are not needed at all. I never use them and rely completely on gravity and time to settle the oil after it has been through the Termimesh and Bunnings bag filters. If you are using this set up as a guide to build your own, I'd leave out these blue filters with their cartridges. The electric motor driving the gear pump has failed due to condensation building up inside the switch gear. It kept on tripping the household circuit breaker and I found half a cup of water inside the motor with no way of escaping - a poor design. The motor has been replaced and the old one will be dried out in the oven and may be able to be used again. On board fuel filters are lasting well over 5000km, and are changed as a precaution at each vehicle service. This proves the upflow system you have just read about is working as well as it needs to for my purposes.
|
January 22, 2014